Have you always wanted to dye Easter eggs with food but it seemed like every idea out there took a very long time or was too elaborate? I had been putting off dying eggs with food for a long because it just seemed like too much work, too many steps and too much of a time commitment.
Can you relate?
Eventually… I decided to give it at go but I knew we had to find a much simpler way to do this. After all, I didn’t want to spend an entire day on this and I also wanted my kids to do this with me. Since I have little ones we had to come up with an easy way to do this so everyone in the family could be involved.
And that’s what we did and I’m sharing with you today. We made this tutorial with instructions for the easiest way to naturally dye your eggs. It’s simple but they also come out pretty cool looking. Check it out:
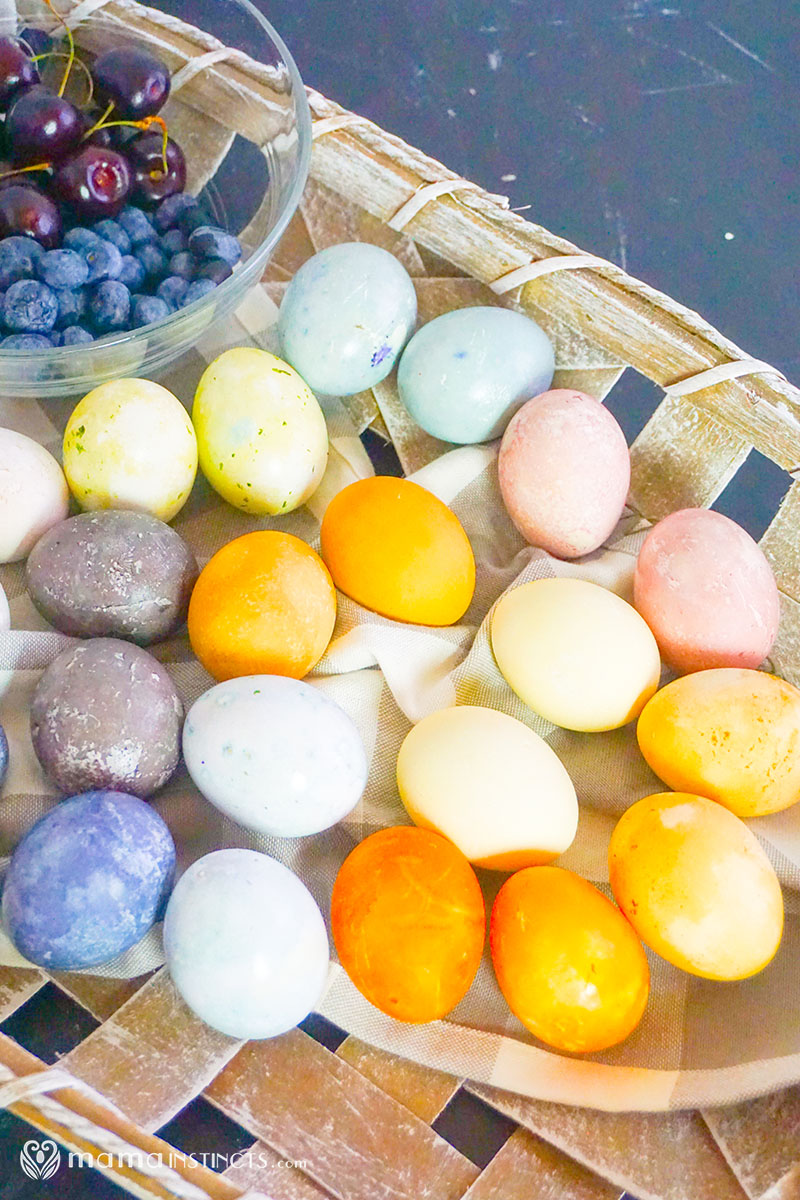
The best part? The kids minds were BLOWN! They had so much fun doing this and loved seeing their creations. It’s like a little science experiment in each jar of dyed eggs!
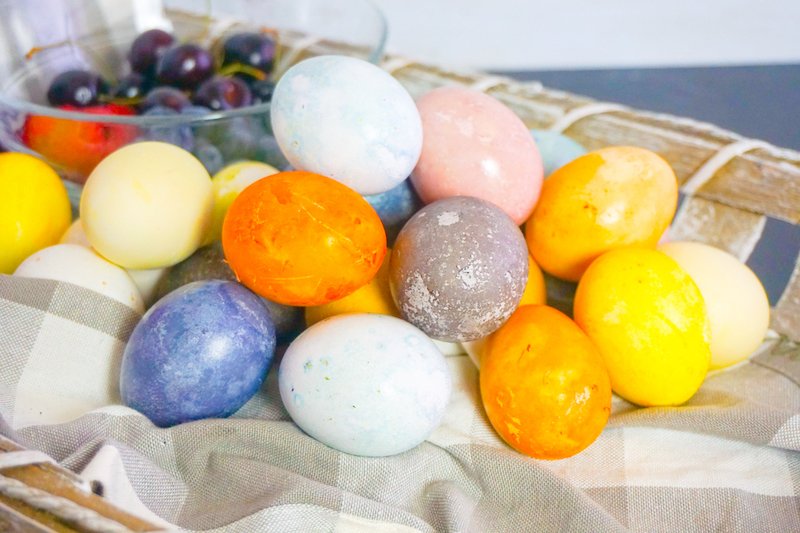
I was so happy, so very happy, with the awesome colors we were able to make. But honestly, the best part was teaching the kids how to make colorful eggs with food, all on their own. It was both an educational experience and one that they had so much fun making! So, it’s now become part of our family tradition.
And, because they’re natural, you don’t have to worry about questionable ingredients or the little ones accidentally tasting the mixture.
This tutorial is simple enough for toddlers to do it with you, and also simple enough for older kids to do it on their own.
Now, let’s get this show on the road and dye some eggs!
If you love this idea, pin this to your favorite Easter board on Pinterest so you can find it again really quickly on the day of and you can find it next year too!
How to Dye Eggs Naturally In Minutes!
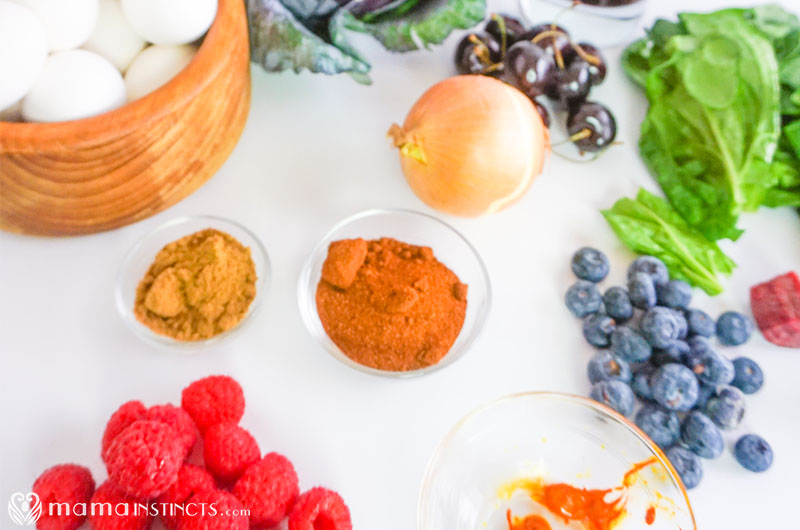
What You Need to Dye Eggs Naturally:
Coloring elements:
- 1 cup Yellow Onion Skins
- 1 cup Black Cherry Juice
- 1 cup Blueberries
- 1 cup Spinach Leaves
- 1 cup Turmeric
- 1 cup Ground Cayenne Pepper
- 1 cup Ground Cumin
- 1 cup Raspberries
- 1 cup Beets, cubed
- 1 cup Red Cabbage
- 1 cup Grape Juice
Other materials:
- 9 cups Warm Water
- 11 tablespoons White Vinegar
- 11 Mason Jars or Glasses
- Immersion Blender
- 12-18 White Boiled Eggs
- 3-4 Paper Towels
Instructions on how to naturally dye eggs:
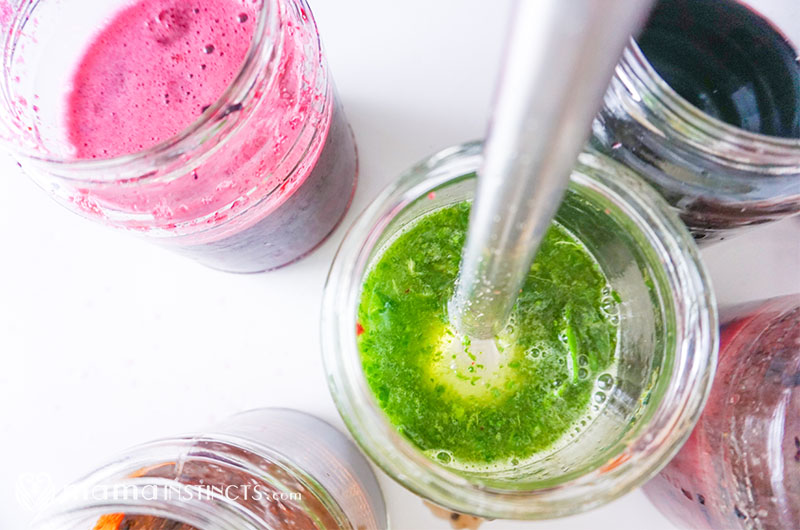
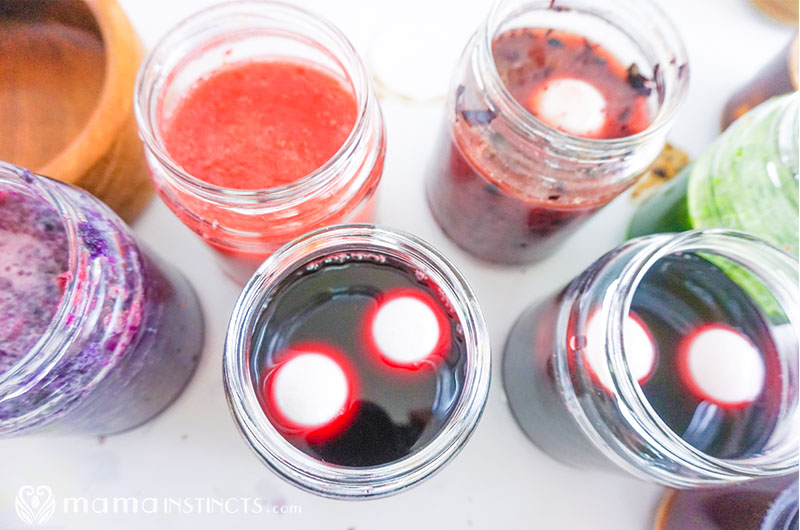
Start by putting each of your coloring elements into a jar or glass with 1 cup of water and 1 tbsp vinegar. With the exception of the grape juice and cherry juice, to those, just add 1 tbsp vinegar, no need to add the water.

Using the immersion blender, blend each of the chunky dying elements in their jar. At this point, for a more intense color, you can heat the jars in the microwave for 2 minutes or on the stove using the double boiler method. However, I found that the color was intense enough without heating it so you can skip this step.
Additionally, if you are so inclined, you CAN strain each of the chunky mixtures, to get just the liquid available to your use. But I found that this wasn’t necessary. You can just dye with the chunks in the jar and it’ll work just fine. Some of the chunks will add a different textured look to your eggs, and since we like that, we leave the chunks in.
Place 1-3 eggs into each jar with the coloring mixture and allow it to sit for 30 minutes.
Then, lightly pat dry (do not rub) each egg and return it to the coloring bath for an additional 30 minutes.
Remove each egg from the coloring bath and lightly pat them dry or set them on a dishcloth to dry.
If you left any chunky bits in the coloring bath, there will be chunky bits attached to each egg. If you don’t like that, be sure to pat the eggs down to remove the chunky bits. We always do this step and remove the chunky parts.

Once dry, your eggs are ready to be used as you please.
Use them to decorate your home, or give them to the easter bunny to hide!
Tip: store them in the fridge so they don’t spoil and the kids can eat them later.
Happy Easter!
More Natural Easter Tutorials You’ll Love
- How to Dye Easter Eggs with Natural Colors (with eco-egg coloring kit)
- Non-Candy Easter Egg Fillers for Toddlers
- DIY Giant Easter Egg

How to Dye Eggs Naturally In Minutes!
The easiest way to naturally dye your easter eggs using food, spices and juices.
Materials
- 1 cup Yellow Onion Skins
- 1 cup Black Cherry Juice
- 1 cup Blueberries
- 1 cup Spinach Leaves
- 1 cup Turmeric
- 1 cup Ground Cayenne Pepper
- 1 cup Ground Cumin
- 1 cup Raspberries
- 1 cup Beets, cubed
- 1 cup Red Cabbage
- 1 cup Grape Juice
- 9 cups Warm Water
- 11 tbsp White Vinegar
- 12-18 White Boiled Eggs
Tools
- 11 Mason Jars or Other Glasses
- Immersion Blender
Instructions
- Start by putting each of your coloring elements into a jar or glass with 1 cup of water and 1 tbsp vinegar. With the exception of the grape juice and cherry juice, to those, just add 1 tbsp vinegar, no need to add the water.
- Using the immersion blender, blend each of the chunky dying elements in their jar. At this point, for a more intense color, you can heat the jars in the microwave for 2 minutes or on the stove using the double boiler method. However, I found that the color was intense enough without heating it so you can skip this step.
Additionally, if you are so inclined, you CAN strain each of the chunky mixtures, to get just the liquid available to your use. But I also found that this wasn’t necessary. - Place 1-3 eggs into each jar with the coloring mixture and allow it to sit for 30 minutes.
- Lightly pat dry (do not rub) each egg and return it to the coloring bath for an additional 30 minutes.
- Remove each egg from the coloring bath and lightly pat them dry or set them on a dishcloth to dry.
If you left any chunky bits in the coloring bath, there will be chunky bits attached to each egg. If you don’t like that, be sure to pat the eggs down to remove the chunky bits. - Once dry, use them to decorate your home, or give them to the easter bunny to hide!
Leave a Reply